How To Grow Garlic In Minnesota

The following guide summarizes the most important information for growing garlic in Minnesota, including the best varieties, planting dates, clove spacing, how much seed is needed, the best soils, fertility needs, when to harvest, and how to store.
Varieties
There are two types of garlic grown in Minnesota, called hardneck and softneck. Hardneck varieties bolt during late spring, producing a flower stalk called a scape. These tender scapes can be removed and eaten. Softneck varieties do not produce a scape under normal growing conditions.
Hardneck varieties are very cold-hardy, making them the best choice for planting in Minnesota and the rest of the Northern United States. Softnecks are better suited for warmer climates, such as the Southern United States, and are not recommended for cold climates.
There are several family groups within the hardneck group. These include Marbled Purple Stripe, Rocambole, Porcelain, and Purple Stripe.

Purple Stripe (left) and Porcelain (right) garlic varieties.
Planting Dates
In Minnesota, garlic should be planted in the fall so that cloves are exposed to the cold temperatures (vernalization) that many garlic varieties require. This means that the garlic cloves will start growing before the ground freezes and will continue the following spring.
Fall planting dates can range depending on where in Minnesota you live, but the goal is to plant early enough for the cloves to develop a large root system, while also planting late enough that only minimal top growth emerges. If leaves do start growing, they may die back over winter, but the cloves will send up new leaves in spring.
In colder zone 3 regions of Minnesota, located in the Northern part of the state, where winter comes early, garlic can be planted as early as September 7 or as late as October 21.
In warmer southern regions with zones 4 and 5, including Minneapolis & St. Paul, where fall is a bit longer, planting can range from September 15 to the first week of November.
Plant Spacing
Garlic plants do best when planted with plenty of space between each bulb to allow for full development. This means cramped, tight spacing usually produces stunted, undersized bulbs at harvest.
To maximize your bulb size, cloves should be spaced at least 5 to 6 inches (12 to 15 cm) apart within the row and 10 to 12 inches (25 to 30 cm) between rows. This will allow each plant to receive full light exposure and will make weeding much easier during the growing season.

Garlic plants spaced at 6 inches within the row and 12 inches between rows.
Planting Technique
It is best to plant cloves with their tips pointing upward. Cloves planted on their sides can still grow nice bulbs, but they sometimes develop curved stocks and misshapen bulbs. Many commercial growers plant cloves on their sides using seeding equipment, while most gardeners and market growers plant by hand with the tips pointed up.
Cloves will quickly dehydrate and deteriorate once they have been "cracked". This means that seed bulbs should be kept as whole bulbs right up until just before planting (within 3 to 5 days). Dry bulbs are easier to crack and separate into cloves than damp bulbs.

High-quality garlic seed cloves ready for planting.
How Many Cloves To Plant
The number of seed bulbs required for planting depends on the variety being grown and the spacing used. A typical growing area can fit approximately 50,000 to 60,000 cloves per acre, or 1,200 to 1500 cloves per 1,000 square feet.
For porcelain varieties like Big Boy or Music, the quantity needed for planting averages about 9000 bulbs or 1000 lbs per acre. For smaller areas, you need about 35 bulbs or 4 lbs per 100 feet for each single row planted.
For Purple Stripe and Rocambole varieties like Russian Red and Spanish Roja, the planting quantity averages about 6,000 bulbs or 700 lbs per acre. For smaller areas, you need about 25 bulbs or 3 lbs per 100 feet for each single row planted.
Best Garlic Soils
Garlic grows well on a wide range of soil types, including both sandy and clay soils. It can be successfully cultivated anywhere in Minnesota with soils suitable for vegetables. Planting on raised beds 4 to 6 inches high is recommended, especially on heavier soils.
The best garlic soils are Sandy Loam with high organic matter. They are ideal because of their high moisture and nutrient-holding ability. These soils are also less prone to crusting, settling or compaction issues and usually drain excess moisture easily.
Heavy clay soils can be a challenge and hard to work with, especially under wet conditions, but some of the largest garlic bulbs are produced on these soils. Using raised beds and adding organic matter can significantly improve clay soils.
On light sandy soils, planting and harvesting are easy, but special soil management practices are required due to their poor fertility and low moisture-holding capacity. Adding organic matter and using cover crops is important.
Fertility
Garlic is a heavy feeder and grows best in fertile soils. If fertilizer (conventional or organic) is required, all the phosphorus and potassium should be added and incorporated before planting. About 1/3 of the Nitrogen should be applied before or just after planting in the fall. The remainder should be split into several applications starting in early spring and ending about one month before harvest.
The following table shows general fertility guidelines for garlic in Minnesota. Taking a soil test is always recommended to ensure you are applying the proper amount of fertilizer. If you have any fertility-related questions, it is always best to speak with your local state agricultural extension service or an ag professional for assistance.
For more information, see "Learn How To Fertilize Your Garlic."
|
Nutrient |
Pounds per Acre |
Pounds per 1000 ft2 |
|
Nitrogen |
120 lbs (55 kg) |
3 lbs (1.3 kg) |
|
Phosphorus |
160 lbs (73 kg) |
4 lbs (1.8 kg) |
|
Potassium |
150 lbs (68 kg) |
4 lbs (1.8 kg) |
|
Sulphur |
30 lbs (14 kg) |
1 lb (0.5 kg) |
Fertility recommendations for growing garlic.
Planting Location
It is best to plant garlic in a sheltered location with good snow cover. This will protect the cloves until spring and help prevent winter kill. Adequate shelter also reduces wind speeds and creates warm microclimates in spring, which helps garlic plants develop quickly.
It is essential to pick a location with good drainage, especially on heavier soils. There should be proper access to water if irrigation is required. Large trees near the planting area should be avoided when possible, as well as any areas infested with perennial weeds such as quack grass or thistle.

Mulching
Most Minnesota growers mulch their garlic for the winter. Mulching helps moderate soil temperatures and keeps cloves protected from temperature fluctuations.
Wheat straw is the most commonly used mulch and should be applied 4 to 6 inches (10 to 15 cm) deep directly over the planted garlic. Other types of mulch, such as oat straw, hay or leaves, can also be used.
In early spring, some growers remove the mulch completely once the threat of extreme cold is gone. Removal helps warm the soil once the snow melts, minimizes disease during wet weather, and makes weeding easier during the growing season. Other growers leave it on throughout the season to conserve moisture and provide a barrier for weed control.

Garlic rows covered with straw mulch for the winter.
Watering
Garlic needs consistent moisture throughout the season to maximize its growth. Dry soil conditions, especially during the bulbing phase, will result in much smaller bulbs at harvest.
On clay and loam soils, approximately 1 inch (2.5 cm) of water per week is required during the growing season. On sandy soils, 2 inches (5.0 cm) or more water is often required during hot, dry weather.
The best time to water is in the morning or mid-afternoon. This schedule allows the plant foliage to dry before cooler temperatures arrive in the evening, while avoiding the hottest parts of the day when watering is less efficient.
Watering should be stopped once the garlic has matured, which is around 1 to 2 weeks before harvest. Dryer soil helps with the harvesting process and improves bulb wrapper quality by reducing deterioration.
Weed Management
Garlic plants are very weak competitors and require dedicated weed control to maximize bulb sizes. Weeding can be done with hand hoes, wheel hoes, tillers, mechanical cultivation with a tractor, mulching, or herbicides. Garlic plants have very shallow roots that can be easily damaged, so care should always be taken when tilling or cultivating. Damage to garlic roots can significantly reduce yields.
Scape Removal
To grow the largest hardneck bulbs, scapes should be removed once they begin to curl. Research shows that bulb size can be reduced by 30% or more when scapes are not removed. Scape development results in energy being used to grow the flower and bulbils instead of increasing bulb size.
Scapes can be removed by snapping or cutting them just after they have one or two curls (depending on the variety), but before they straighten out. Scapes are wonderful to eat and can be cooked on their own or in recipes that call for garlic. Most growers harvest them to eat or sell. They can be stored in the refrigerator for up to a month.
Softnecks do not generally produce scapes, but in cold climates like Minnesota, some plants may still form bulbils within the stem.
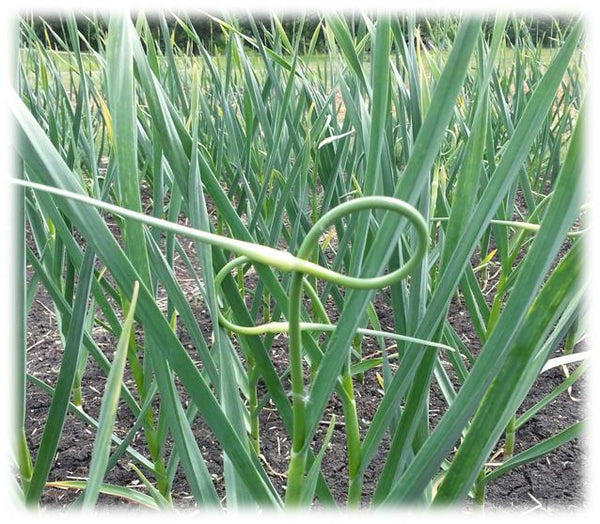
A Purple Stripe garlic scape ready for removal.
Harvesting
Garlic bulbs continue to grow in size throughout late spring and summer until the plant's leaves begin to die. This process starts with the lower leaves, which dry and turn brown from the tips, progressing towards their bases.
Harvesting should begin when 30%-50% of the leaves have died and completely turned brown. For most plants, this means about 3 to 5 leaves have died, and 3 to 5 are still green, depending on the variety. Bulbs harvested too early will be immature and are likely to shrink when cured. Late-harvested bulbs tend to be stained and often have open wrappers with exposed cloves that do not store well.
For small growing areas, hand-harvesting can be done by using a pitchfork or broadfork to loosen the soil and make removal easier. Large plantings of garlic are usually harvested mechanically, using an under-cutter blade pulled by a tractor that cuts the roots and loosens the soil, making hand-harvesting less labour-intensive.
For more information, see "When to Harvest Your Garlic".
Curing
Curing is the process of drying bulbs and reducing moisture content. It reduces microbial and fungal growth, increasing storage life.
Garlic should be cured immediately after harvest. Plants can be left in the field to begin drying for a few days. Plants should be laid on the ground in single-layer rows. When laying down the garlic plants, use the tops of later rows to cover the bulbs of the previous rows, protecting them from sun scald.
Alternatively, the garlic can be removed from the field immediately after harvest and brought inside for the entire curing process. Plants can be tied in bundles of 10 and hung to dry, or the tops can be removed and the bulbs placed into slotted crates, onto wire racks, or in open trays in a well-ventilated area. Using large fans to create continuous air movement helps with drying and preventing mold and storage diseases.

Harvested garlic lying in the field to dry for several days.
Storage
For most homeowners and small farms, garlic used for food can be stored at room temperature in a well-ventilated area. Humid conditions should be avoided as they can cause mold and disease issues.
Garlic that is to be used as seed for planting, should be stored above 55⁰F (13°C) to prevent sprouting and below 68⁰F (20°C), to prevent premature dehydration.
Hardneck varieties can usually be stored up to 6 months at room temperature, while softneck varieties can be stored up to 10 months.
If you're looking for high-quality seed garlic, visit our Online Store! If you need more growing information, see our other Growing Garlic articles!
About the Author: John Cote owns and operates a garlic farm with his family, who have been farming the same land for over 140 years. As an agronomist and experienced farmer, he helps others learn how to grow garlic successfully. He has written many articles and is the author of The Master Guide to Growing Big Garlic.